
Welcome! In this chapter, you’ll get GitHub Copilot CLI (Command Line Interface) installed, signed in with your GitHub account, and verified that everything works. This is a quick setup chapter. Once you’re up and running, the real demos start in Chapter 01!
🎯 Learning Objectives
By the end of this chapter, you’ll have:
- Installed GitHub Copilot CLI
- Signed in with your GitHub account
- Verified it works with a simple test
⏱️ Estimated Time: ~10 minutes (5 min reading + 5 min hands-on)
✅ Prerequisites
- GitHub Account with Copilot access. See subscription options. Students/Teachers can access Copilot Pro for free via GitHub Education.
- Terminal basics: Comfortable with commands like
cdandls
What “Copilot Access” Means
GitHub Copilot CLI requires an active Copilot subscription. You can check your status at github.com/settings/copilot. You should see one of:
- Copilot Individual - Personal subscription
- Copilot Business - Through your organization
- Copilot Enterprise - Through your enterprise
- GitHub Education - Free for verified students/teachers
If you see “You don’t have access to GitHub Copilot,” you’ll need to use the free option, subscribe to a plan, or join an organization that provides access.
Installation
⏱️ Time estimate: Installation takes 2-5 minutes. Authentication adds another 1-2 minutes.
Recommended: GitHub Codespaces (Zero Setup)
If you don’t want to install any of the prerequisites, you can use GitHub Codespaces, which has the GitHub Copilot CLI ready to go (you’ll need to sign in), pre-installs Python 3.13, pytest, and the GitHub CLI.
- Fork this repository to your GitHub account
- Select Code > Codespaces > Create codespace on main
- Wait a few minutes for the container to build
- You’re ready to go! The terminal will open automatically in the Codespace environment.
💡 Verify in Codespace: Run
cd samples/book-app-project && python book_app.py helpto confirm Python and the sample app are working.
Alternative: Local Installation
💡 Not sure which to pick? Use
npmif you have Node.js installed. Otherwise, choose the option that matches your system.
💡 Python required for demos: The course uses a Python sample app. If you’re working locally, install Python 3.10+ before starting the demos.
Note: While the primary examples shown throughout the course use Python (
samples/book-app-project), JavaScript (samples/book-app-project-js) and C# (samples/book-app-project-cs) versions are also available if you prefer to work with those languages. Each sample has a README with instructions for running the app in that language.
Choose the method that works for your system:
All Platforms (npm)
# If you have Node.js installed, this is a quick way to get the CLI
npm install -g @github/copilot
macOS/Linux (Homebrew)
brew install copilot-cliWindows (WinGet)
winget install GitHub.CopilotmacOS/Linux (Install Script)
curl -fsSL https://gh.io/copilot-install | bashOptional: Enable shell tab completion
Shell tab completion lets you press Tab to complete copilot subcommands, command options, and some option values. This is optional, but it can be handy once you’re comfortable using the CLI.
Copilot CLI currently supports completion scripts for Bash, Zsh, and Fish:
# Bash, current session only
source <(copilot completion bash)

# Bash, persistent on Linux
copilot completion bash | sudo tee /etc/bash_completion.d/copilot

# Zsh
copilot completion zsh > "${fpath[1]}/_copilot"

# Fish
copilot completion fish > ~/.config/fish/completions/copilot.fish
Restart your shell after adding persistent completion. PowerShell is supported for running Copilot CLI on Windows, but copilot completion currently supports only Bash, Zsh, and Fish.
Authentication
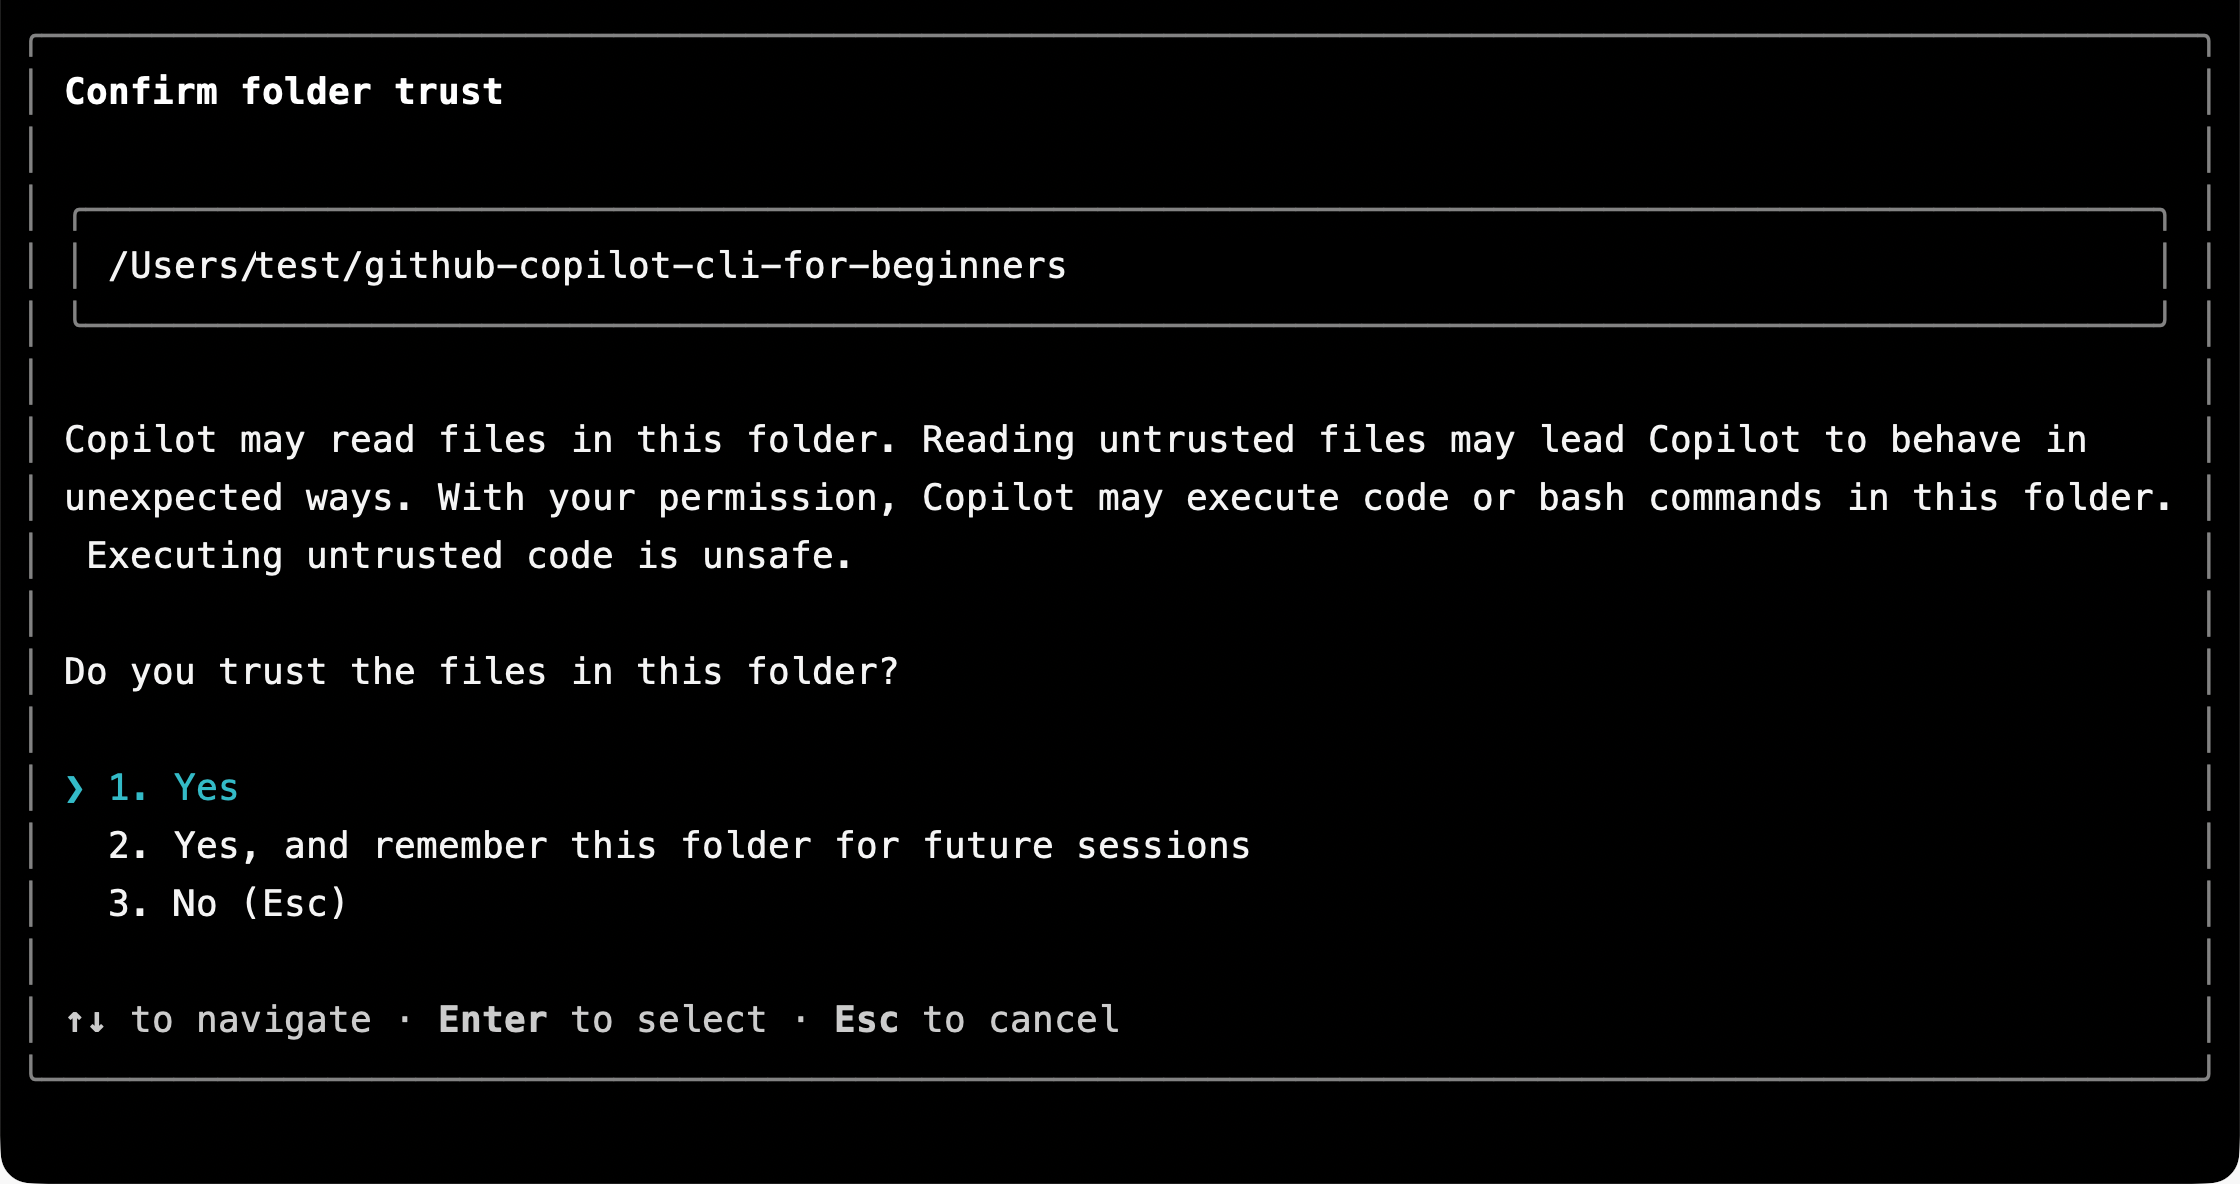
Open a terminal window at the root of the copilot-cli-for-beginners repository, start the CLI and allow access to the folder.
copilotYou’ll be asked to trust the folder containing the repository (if you haven’t already). You can trust it one time or across all future sessions.
After trusting the folder, you can sign in with your GitHub account.
> /loginWhat happens next:
- Copilot CLI displays a one-time code (like
ABCD-1234) - Your browser opens to GitHub’s device authorization page. Sign in to GitHub if you haven’t already.
- Enter the code when prompted
- Select “Authorize” to grant GitHub Copilot CLI access
- Return to your terminal - you’re now signed in!
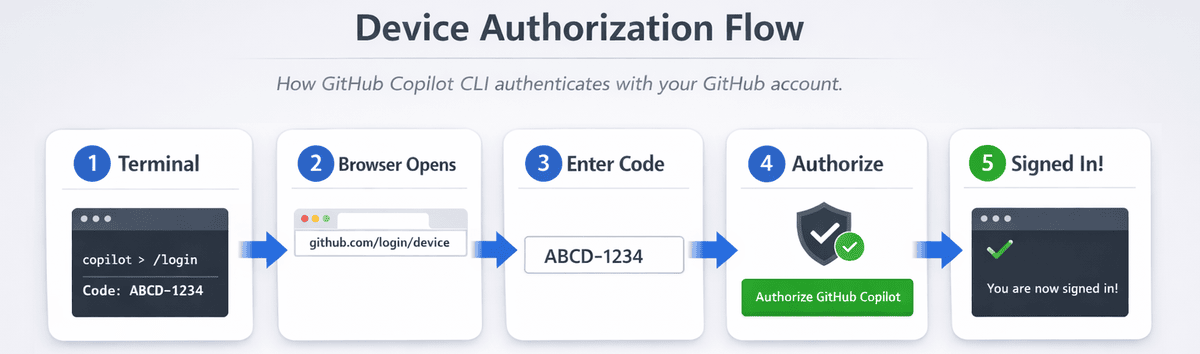
The device authorization flow: your terminal generates a code, you verify it in the browser, and Copilot CLI is authenticated.
Tip: The sign-in persists across sessions. You only need to do this once unless your token expires or you explicitly sign out.
Verify It Works
Step 1: Test Copilot CLI
Now that you’re signed in, let’s verify that Copilot CLI is working for you. In the terminal, start the CLI if you haven’t already:
> Say hello and tell me what you can help withAfter you receive a response, you can exit the CLI:
> /exit🎬 See it in action!
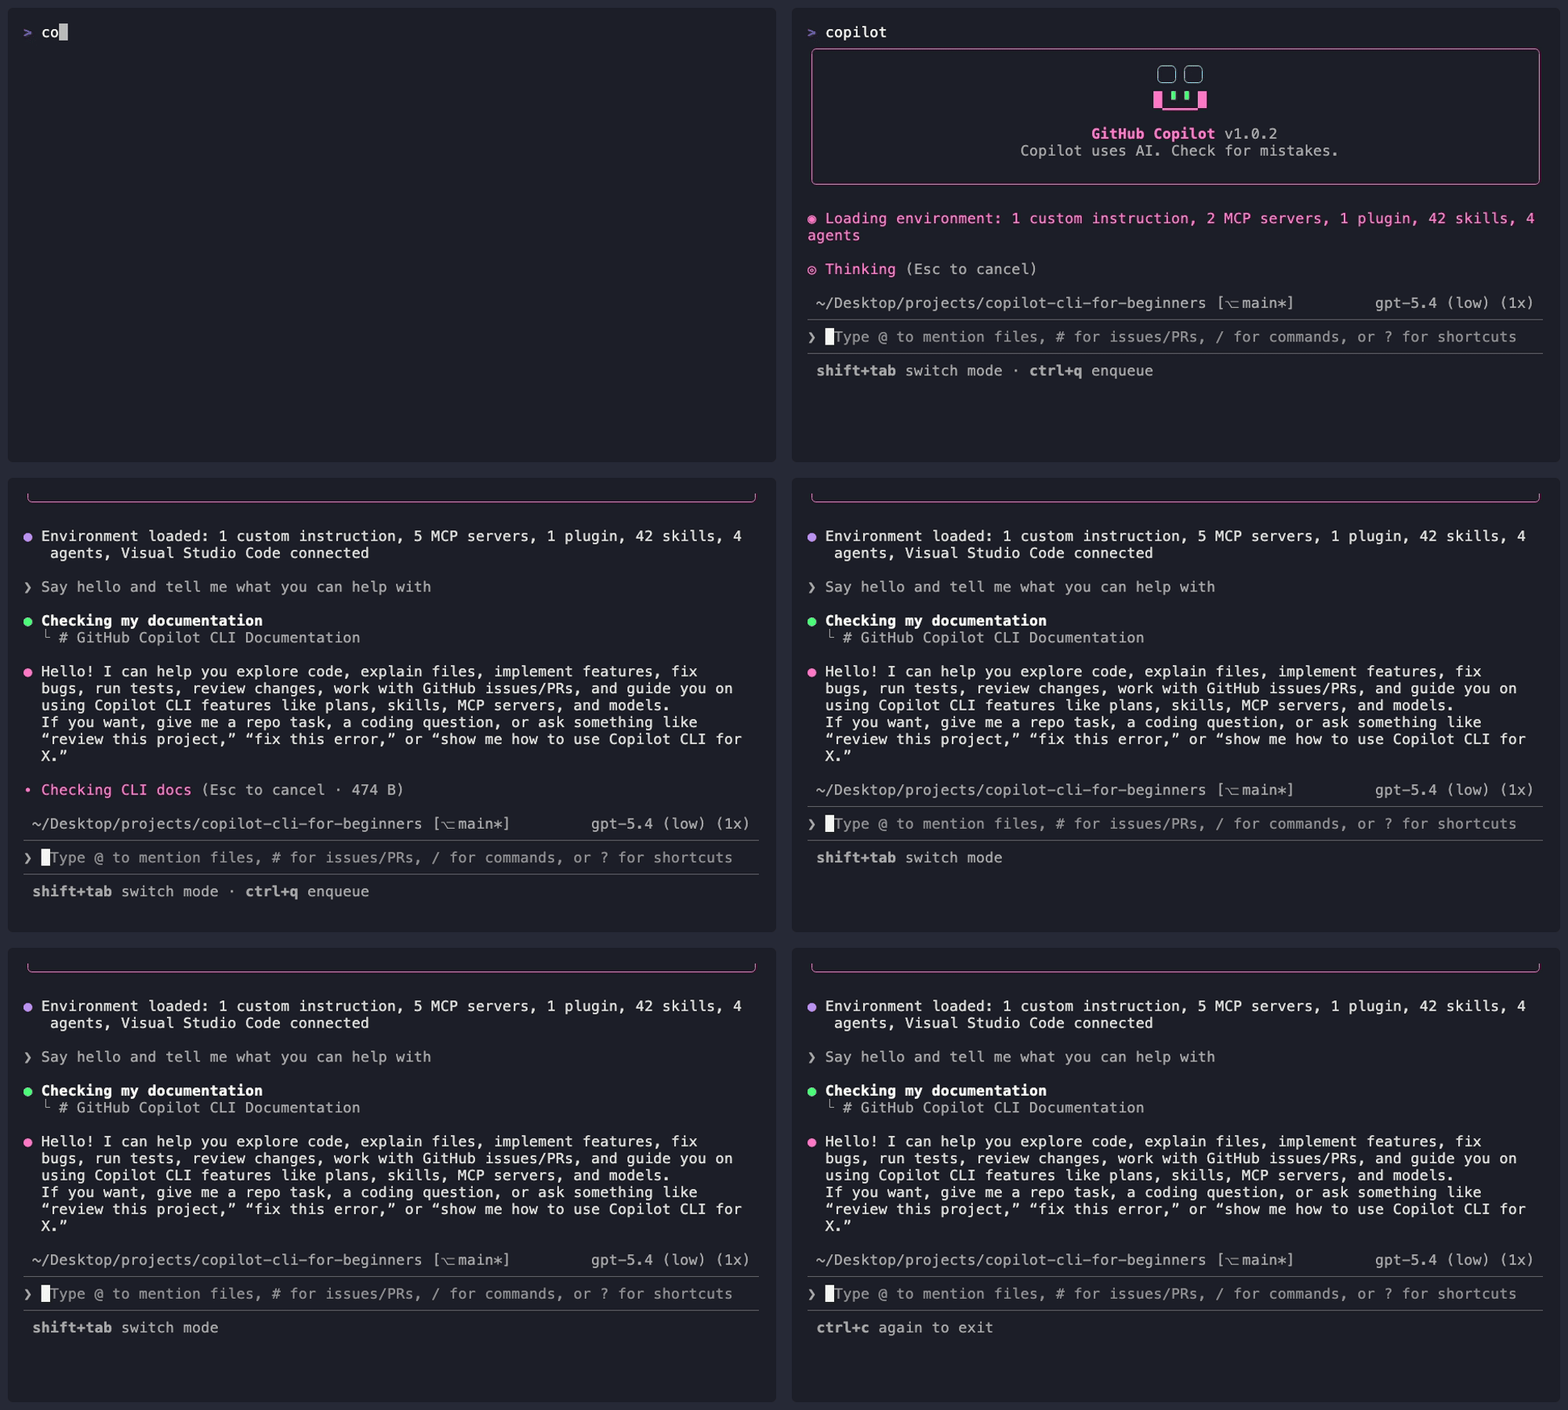
Demo output varies. Your model, tools, and responses will differ from what’s shown here.
Expected output: A friendly response listing Copilot CLI’s capabilities.
Step 2: Run the Sample Book App
The course provides a sample app that you’ll explore and improve throughout the course using the CLI (You can see the code for this in /samples/book-app-project). Check that the Python book collection terminal app works before you get started. Run python or python3 depending on your system.
Note: While the primary examples shown throughout the course use Python (
samples/book-app-project), JavaScript (samples/book-app-project-js) and C# (samples/book-app-project-cs) versions are also available if you prefer to work with those languages. Each sample has a README with instructions for running the app in that language.
cd samples/book-app-project
python book_app.py list
Expected output: A list of 5 books including “The Hobbit”, “1984”, and “Dune”.
Step 3: Try Copilot CLI with the Book App
Navigate back to the repository root first (if you ran Step 2):
cd ../..   # Back to the repository root if needed
copilot
> What does @samples/book-app-project/book_app.py do?
Expected output: A summary of the book app’s main functions and commands.
If you see an error, check the troubleshooting section below.
Once you’re done you can exit the Copilot CLI:
> /exit✅ You’re Ready!
That’s it for installation. The real fun starts in Chapter 01, where you’ll:
- Watch AI review the book app and find code quality issues instantly
- Learn three different ways to use Copilot CLI
- Generate working code from plain English
Continue to Chapter 01: First Steps →
Troubleshooting
”copilot: command not found”
The CLI isn’t installed. Try a different installation method:
# If brew failed, try npm:
npm install -g @github/copilot

# Or the install script:
curl -fsSL https://gh.io/copilot-install | bash
“You don’t have access to GitHub Copilot”
- Verify you have a Copilot subscription at github.com/settings/copilot
- Check that your organization permits CLI access if using a work account
”Authentication failed”
Re-authenticate:
copilot
> /login
Browser doesn’t open automatically
Manually visit github.com/login/device and enter the code shown in your terminal.
Token expired
Simply run /login again:
copilot
> /login
Still stuck?
- Check the GitHub Copilot CLI documentation
- Search GitHub Issues
🔑 Key Takeaways
- A GitHub Codespace is a quick way to get started - Python, pytest, and GitHub Copilot CLI are all pre-installed so you can jump right into the demos
- Multiple installation methods - Choose what works for your system (Homebrew, WinGet, npm, or install script)
- One-time authentication - Login persists until token expires
- The book app works - You’ll use
samples/book-app-projectthroughout the entire course
📚 Official Documentation: Install Copilot CLI for installation options and requirements.
📋 Quick Reference: See the GitHub Copilot CLI command reference for a complete list of commands and shortcuts.